Outdoor fans can make your patio, deck, or backyard much more comfortable. They help keep the air moving, making hot days more bearable. In this guide, we will show you step by step how to install a fan that is made for outdoor spaces. We will share outdoor fan installation tips and cover everything you need to know.
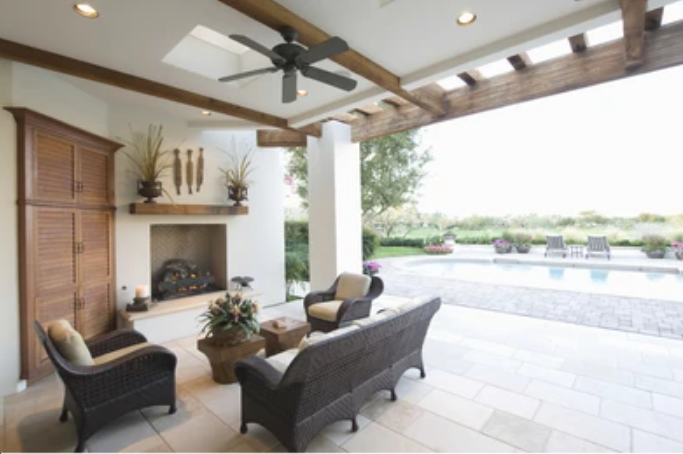
When the sun beats down during a hot day, an outdoor fan can make a big difference. Fans are not just for indoor rooms they are great for outdoor areas too. You can use them on patios, decks, porches, or even in outdoor dining areas. Installing an outdoor fan can improve air circulation and help create a cool and pleasant space to relax.
Benefits of Using Outdoor Fans
1. Improved Comfort
Outdoor fans help keep the air moving in your outdoor space. When the air moves, it feels cooler even if the temperature does not drop a lot. This can make your patio or deck a nice place to sit and relax.
2. Better Air Circulation
A fan does more than just cool you down. It helps circulate the air so that any hot spots or areas with still air are reduced. This can also help prevent the buildup of insects and pollen.
3. Energy Savings
Using a fan to cool an area is much cheaper than running an air conditioner. Outdoor fans use less power, which means lower energy bills. This makes them an energy-saving choice for many families.
4. Added Style and Value
A well-installed outdoor fan can also add style to your home. Many fans come in different designs and finishes that can match your outdoor decor. They can make your space look more modern and welcoming.
Choosing the Right Outdoor Fan
Before installing an outdoor fan, choose one that is suitable for your space. Here are some tips to help you choose:
Weather Resistance
Outdoor fans must be able to handle rain, wind, and sun. Look for fans that are labeled as weatherproof or “outdoor-rated.” These fans are made with materials that will not rust or fade easily.
Size and Type
- Ceiling Fans: Great for covered patios or outdoor rooms. They work well in spaces that have a roof.
- Wall Fans: These can be mounted on a wall and are good for small areas.
- Portable Fans: If you want the flexibility to move the fan around, a portable model might work best.
Energy Efficiency
Choose a fan that uses less electricity. Energy-efficient fans help lower your power bills and are better for the environment.
Design and Style
Since the fan will be in your outdoor space, pick one that matches your style. Whether you prefer a modern look or something classic, there are many options to choose from.
Tools and Materials Needed
Before you begin your project, gather the tools and materials you will need. Here is a simple list:
- Fan Kit: This includes the fan, mounting bracket, and any screws or bolts.
- Drill: You will need this to make holes for the mounting bracket.
- Screws and Bolts: These secure the fan in place.
- Measuring Tape: To measure the area where you want to install the fan.
- Level: To ensure that the fan is installed straight.
- Screwdriver: For tightening screws.
- Ladder: If you are installing a ceiling or wall fan in a high place.
- Pencil: To mark where you need to drill.
- Safety Gear: Such as gloves and safety glasses to protect your hands and eyes.
- Weatherproof Sealant (optional): To help protect the installation from water and moisture.
Step-by-Step Outdoor Fan Installation Guide
Here is a clear, step-by-step guide to installing an outdoor fan.
Step 1: Read the Instructions
Before you begin, read the instructions that come with your fan kit. Every fan may have different parts or steps, so it is important to understand the specific instructions for your model.

Step 2: Choose the Right Location
Decide where you want to install the fan. The location should be:
- Easy to reach for cleaning and maintenance.
- Close to a power source if your fan needs electricity.
- Protected from the worst of the weather if possible (for example, under a covered patio).
Mark the spot with a pencil where you want the fan to go.
Step 3: Gather Your Tools and Materials
Make sure you have all the tools and materials listed earlier. Keep them close by so you do not have to search for them during the installation.
Step 4: Install the Mounting Bracket
Most outdoor fans come with a mounting bracket. Follow these steps to install it:
- Mark the Holes: Hold the bracket against the wall or ceiling where you want to install the fan. Use a pencil to mark where the holes will go.
- Drill the Holes: Use the drill to make holes at the marks you made.
- Attach the Bracket: Use screws and a screwdriver to attach the bracket securely. Use a level to check that the bracket is straight.
- Apply Weatherproof Sealant (if needed): If you are installing the fan in a place exposed to heavy rain, apply a small amount of weatherproof sealant around the holes to keep water out.
Step 5: Prepare the Fan for Installation
Before hanging the fan, check all the parts to make sure they are in good condition. Assemble any parts of the fan that need to be put together according to the instructions.
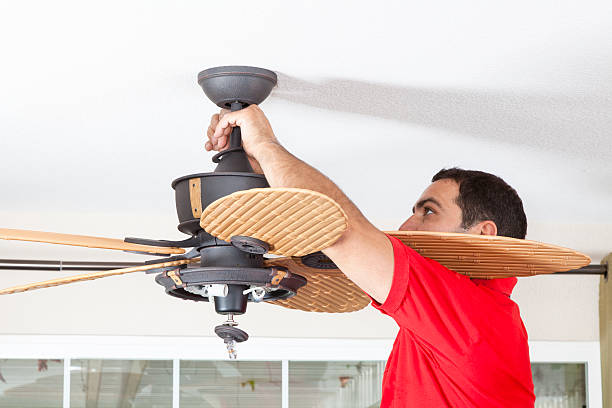
Step 6: Hang the Fan
Once the bracket is securely in place:
- Attach the Fan: Follow the fan’s instructions to attach it to the mounting bracket. This may involve aligning the fan parts and securing them with screws or bolts.
- Connect the Wiring: If your fan is electric, you may need to connect the wires. Make sure the power is turned off before working with any wiring. Follow the instructions carefully or ask for help if you are not sure how to do it.
- Secure All Parts: Check that all screws and bolts are tight and that the fan is firmly attached.
Step 7: Test the Fan
After installing the fan, it is important to test it:
- Turn the power back on.
- Use the fan’s switch or remote control to start it.
- Listen for any unusual noises and make sure the fan spins smoothly.
- Check that the fan is moving air effectively.
Step 8: Final Adjustments
If the fan wobbles or does not work correctly:
- Tighten any loose screws.
- Adjust the mounting bracket if needed.
- Ensure that the fan blades are balanced and free from any obstruction.
Outdoor Fan Installation Tips
Here are some useful outdoor fan installation tips to help you get the best result:
Use Weatherproof Materials
Always use materials that are designed to withstand outdoor conditions. This includes screws, bolts, and sealants that are labeled as weatherproof or outdoor-rated.
Follow the Instructions Closely
Each fan is different. Read the manual carefully and follow all the steps. This helps avoid mistakes that can lead to problems later.
Turn Off the Power
Safety is very important. Always turn off the power at the breaker box before you start working on any electrical connections. This prevents the risk of electric shock.
Use a Helper
If possible, ask a friend or family member to help you. One person can hold the fan while the other installs the bracket or drills the holes. This makes the job easier and safer.
Check Local Codes
Depending on where you live, there may be local building or electrical codes that you need to follow. Make sure your installation meets these codes to avoid any legal issues.
Regularly Inspect the Fan
After the fan is installed, it is a good idea to check it regularly. Look for any loose screws or signs of wear. Keeping the fan in good condition will help it last longer and work better.
Keep a Clean Work Area
Before and after installation, clean your work area. This prevents accidents and makes it easier to find any tools you may have dropped.
Maintain the Fan
Regular maintenance is important for keeping your fan in top shape. Clean the blades and check the wiring and mounting once every few months. This simple care will ensure your fan keeps working well.
FAQs
1. What Tools Do I Need to Install an Outdoor Fan?
You will need:
- A fan kit (with the fan, mounting bracket, and screws)
- A drill and drill bits
- Screws and bolts
- A measuring tape, level, and pencil
- A screwdriver
- A ladder (if installing high up)
- Safety gear like gloves and safety glasses
2. Can I Install an Outdoor Fan by Myself?
Yes, you can install an outdoor fan by yourself if you follow the steps carefully. However, it is always a good idea to have an adult or a friend help you, especially when working with electrical parts and a ladder.
3. Do I Need to Turn Off the Power Before Installing the Fan?
Yes, always turn off the power at the breaker box before working with any electrical wiring. This is very important for your safety.
4. How Do I Choose the Right Spot for My Outdoor Fan?
Choose a spot that is:
- Close to a power source if your fan is electric
- Protected from heavy rain or extreme weather
- Easy to reach for maintenance
- Located where air circulation will help cool the area
5. What Should I Do if My Fan Wobbles After Installation?
If your fan wobbles, it may be because the mounting bracket is loose or the screws are not tightened. Check all the connections, use a level to make sure it is straight, and tighten any loose parts. If the problem persists, consult the fan’s manual or ask for professional help.
6. How Often Should I Maintain My Outdoor Fan?
It is a good idea to inspect and clean your fan every few months. Look for loose screws, dust buildup, or any damage. Regular maintenance will help your fan last longer and work better.
7. Can I Install an Outdoor Fan on a Wall or a Ceiling?
Yes, outdoor fans come in different types. Some are designed to be mounted on a wall, while others are made for the ceiling. Choose the type that best fits your outdoor space and follow the installation instructions for that model.
8. What Are Some Safety Tips for Outdoor Fan Installation?
- Always turn off the power before you begin.
- Wear safety gear like gloves and safety glasses.
- Use a sturdy ladder if the fan is high up.
- Ask for help if you need it.
- Follow all instructions in the manual.
9. Will My Outdoor Fan Work in Bad Weather?
Outdoor fans that are labeled as weatherproof are designed to handle rain, wind, and sun. However, during very harsh weather, it is best to turn off the fan to protect it. Check the manufacturer’s instructions for guidance.
10. How Can I Tell if My Fan is Energy-Efficient?
Look for energy ratings or labels on the fan. Energy-efficient fans use less power and are good for saving on electricity bills. Reading reviews and checking the specifications can also help you decide.
Conclusion
Installing fans suitable for outdoor spaces is a project that can make your patio, deck, or backyard more comfortable and inviting. Outdoor fans help cool the air, improve circulation, and add a stylish touch to your home. By following this guide and using our outdoor fan installation tips, you can successfully set up a fan that will work well even in outdoor conditions.
